The Maps of Battlefield V: Hamada
Learn how to lead your squad to victory on this sizzling desert map.
Welcome to Hamada, one of the largest maps in the history of the Battlefield™ series. This article will give you an excellent overview of this massive, sun-baked map, plus the details you’ll need to keep your squad alive on it.
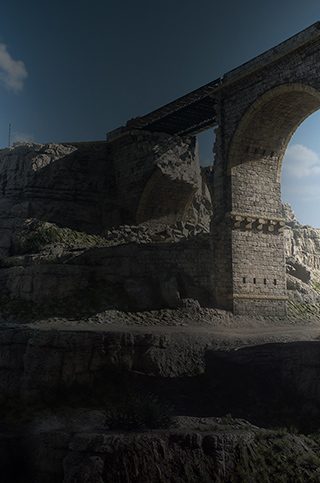
“Hamada” is Arabic for a barren landscape of gravel and bare rock, and it perfectly describes the map. A towering aqueduct-like bridge spans the dry ravine, one of the few signs that remain of a once-thriving civilization. There was life here, once, too – now all lies in ruins and rubble, ground to dust beneath tank treads and infantry boots.
Map Overview
Hamada is one of two Battlefield™ V maps set in North Africa (the other being Aerodrome) and inspired by a strategic point between Libya and Egypt. This area was the scene of pivotal battles between the Axis and Allies during 1941 and 1942.
This overview is specific to Conquest mode, the most popular and iconic in the Battlefield series. But these tips are designed to help players succeed in any mode on the Hamada map.
Hamada at a Glance
Units:
- Infantry
- Tanks
- Aircraft
Size:
- Very large
Tempo:
- Moderate
Playstyle
Can’t wait to leap into the cockpit of a fighter plane or behind the turret of a tank? This Battlefield V map is made for you. Ferocious vehicle combat is the focus of this all-out warfare map, but you’ll also need boots on the ground to take and hold the objectives. Infantry will need to focus on what scant cover they can find on the lower elevations, and head to the high ground to really make a difference. And speaking of heights, the flyable space on this map is immense, making it perfect for both intense dogfights and deadly strafing runs.
Available Game Modes
Hamada offers players the opportunity to take on a wide variety of modes, including:
- Airborne – Parachute onto the battlefield and spearhead an invasion or scramble to defend and fortify your positions from the oncoming attack
- Breakthrough – Fight to control sectors as an attacker and push the enemy back to claim vital ground in this intense mode
- Conquest – An all-time Battlefield classic, this vast game mode includes up to 64 players who battle for control of key locations on the map
- Domination – Fast-paced, infantry-based combat in close quarters is where you’ll see the enemy up close and personal and where the fighting revolves around significant strategic objectives
- Frontlines – An intense tug-of-war battle where one single key area at a time is contested
- Team Deathmatch – Kill or be killed is the name of the game; inflict as many casualties on the enemy as possible to emerge victorious.
Days one and two of the North Africa Grand Operation take place here (the remaining days take place on the Aerodrome map). What is Grand Operations? An incredible multiplayer experience where players experience fictional in-operation “days,” each represented by a round played on a single map with a specific mode. Your squad and team’s actions directly impact each following day.
On Hamada, day one opens with Allied paratroopers dropping from the skies in Airborne mode as Axis forces dig in and prepare to hold every inch of territory they can. On day two, the two teams will clash in Conquest, more specifically the Conquest Assault variant, where the round starts with defenders controlling all the flags.
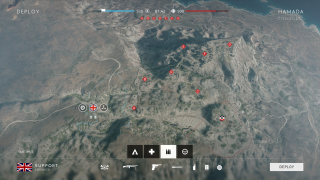
Capture Point A: Ridge Nest
This gigantic map includes seven capture points at a variety of elevations. We’ll begin with Flag A, which is closest to the Allied HQ. Surrounded by low cliffs and boulders, there’s very little in the way of natural cover. This makes the area difficult to defend, but with a bit of foresight, full Fortifications, and the plentiful Supply Stations, infantry has a chance at holding out against vehicle assaults.
Capture Point B: Artillery Camp
Split between two levels, Flag B includes a multitude of vehicle routes leading up to elevated areas perfect for infantry. Fortifications are essential for denying vehicles access, and infantry will need to rely on the trenches and plentiful supply boxes as cover. Strategically speaking, the artillery camp is the ideal launching point for an assault on Flag D.
Capture Point C: Oasis
This desert oasis is no mirage. Vehicles will find the area extremely hard going given the dense clusters of rocks and rubble. They provide plenty of infantry cover and make vehicle movement difficult at best. To hold this area, head for the high ground overlooking the flag, which provides the best defensive position by far.
Capture Point D: Bridge Camp
There are many reasons your team will want to hold this flag; one of the most important is that it grants your forces an additional tank. Second, it gives you control of the bridge leading to the ruins. The bridge is the fastest path to Flag E and a vital choke point for those who can take it. Additionally, the ruined towers provide elevated defensive positions and overall safety from vehicles. For all these reasons and more, holding this flag is critical for a team seeking victory.
Capture Point E: Desert Ruins
The skeletal remains of ancient buildings press close around this flag area, giving it an almost claustrophobic atmosphere. Vehicle drivers should use extreme caution when approaching these ruins as they’re ideal for infantry ambushes, especially from above. That’s not the only danger to be found, either, as the artillery cannons throughout provide excellent coverage of the lower areas.
Capture Point F: Temple
Tank drivers should probably avoid the temple at all costs. This infantry-focused area not only allows for the use of barbed wire and sandbags to control access to the flag but provides swell elevation for defenders to launch surprise attacks. Enemy tanks approaching Flag F should pay particular attention to the tall temple ruins, the most likely place defenders will choose to ambush the unwary.
Capture Point G: Peak Camp
Could your team use an extra plane? Then you’ll want to control Flag G. High atop a plateau, this Axis stronghold leaves no room for retreat. The area is worth defending though, as it also includes an airstrip for Axis planes to take off from. Infantry will need to hug the edges of the capture area, using scattered military hardware for cover, when battling enemy vehicles as there are few Fortifications.
Check out how to play on the rest of the eight launch maps so you’re prepared when you hit the battlefield: Narvik, Fjell 652, Rotterdam, Devastation, Arras, Twisted Steel, and Aerodrome.
Deploy on the battlefield with style – pre-order Battlefield V and get the Firestorm Ranger Set*.
Enter mankind’s greatest conflict on Xbox One, PlayStation®4, and PC. On November 9, play the full game with Origin Access Premier or try it as part of the EA Access and Origin Access Play First Trials**. Or, join the fight on November 15 with Battlefield™ V Deluxe Edition early enlister access, or November 20 with the Battlefield™ V Standard Edition.
Sign up today to receive the latest Battlefield news, updates, behind-the-scenes content, exclusive offers, and more (including other EA news, products, events, and promotions) by email.
Follow Battlefield on Twitter and Instagram, like us on Facebook, and subscribe to our YouTube channel. Hop in and join the Battlefield Community on the Battlefield Forums, and discuss with us on Reddit and Discord.
*Conditions and restrictions apply. See https://www.ea.com/games/battlefield/disclaimers
**CONDITIONS, LIMITATIONS AND EXCLUSIONS APPLY. SEE ea.com/ea-access/terms AND origin.com/store/origin-access/terms FOR DETAILS.
Note that game content, gameplay mechanics, and other Battlefield V aspects covered in this article may change between now and the launch of the game.