
Exploring the Locations of Star Wars™ Battlefront™ II: Death Star II
Tips and tricks for battling through Command Sector North in the world-shattering battle station of the Empire.

How do you recover from having your planet-destroying superweapon, well, destroyed, by a bunch of Rebels? You build a bigger, better, and more powerful one, of course. That’s exactly what the Galactic Empire did.
Death Star II spanned more than 160 kilometers in diameter, compared to its predecessor’s 120, and was equipped with 15,000 heavy turbolasers, 15,000 standard turbolasers, 7,500 laser cannons, and 5,000 ion cannons. It undoubtedly earned its space battle station label. While being built, it was held stationary in space above Endor by a repulsorlift field, created from the shield generator situated on the forest moon.
Despite being under construction during the Battle of Endor, its main weapon, the superlaser array, was fully operational. The Rebels could just watch flabbergasted as the armament powered by kyber crystals (the same crystals used for constructing lightsabers) dissolved their Liberty star cruiser during the combat above the Ewok home world.
However, the engagement eventually concluded the story of the second Death Star, bringing the Dark Lords of the Sith to meet their fates as well.
But before the finale of this momentous event, the scenario in Galactic Assault on Death Star II tells of an Alliance Corvette crashing straight into its hull, leaving the surviving Rebels with the mission of fighting their way out.
Location name: Death Star II – Command Sector North
Known for: Its planet-destroying superlaser.
Available game modes: Galactic Assault, Blast, Strike, Heroes vs. Villains, and Hero Showdown.
“We’re detecting multiple Rebel survivors. I expect they’ll try to sabotage then escape the Death Star. The enemy must be contained and eliminated.” – Imperial officer shortly after the Alliance vessel plunged into Death Star II.
Shutting Down the Tractor Beam
The Death Star II had, as depicted above, a tremendous amount of firepower, and it also possessed tractor beam technology. The technology was used to guide incoming vessels to a safe landing on space stations and starships, but it could also be used offensively to stop hostile ships from fleeing.
In Star Wars™: Episode IV – A New Hope™, the first Death Star used its tractor beam to pull in the approaching Millennium Falcon into one of its hangar bays. In order to let Han Solo, Leia Organa, and the rest of the crew escape, Obi-Wan Kenobi snuck into the sector hosting the tractor beam controls and disabled it.
The Rebels need to do something similar in the beginning of a three-phase escape-plan from Command Sector North on the second Death Star, and it’s going to be much louder this time around.
After rushing through burning debris caused by the impact of the Alliance Corvette, two objectives are marked in front of the Rebels. With the distinct sound of the Imperial alert bouncing between the walls, the Rebels push forward to override the tractor beam’s generator and controls.
Choosing between the classes, the Assault, Officer, and Heavy are all viable options. This goes for both factions. The Specialist can get the job done as well, but with so many tight spaces and choke points, we’d only recommend it to anyone who’s comfortable with using the class’s long-range rifles at a short to medium distance.
Looking at Abilities, the Assault’s Scan Dart is great for pinging incoming enemies. This is especially useful on close-quarters maps like Death Star II, where potential threats are lurking behind every turn and corner. The Acid Launcher is another fantastic tool that will force the enemy to think twice before pushing for the objectives, by closing off the corridors with a curtain of harmful gas.
Also, the Officer’s Squad Shield Ability is invaluable for the Rebels in all phases on Death Star II. Place it around the objective, and it will efficiently protect your team while it’s being captured. This goes for both the tractor beam generator and tractor beam control, where you otherwise might struggle to find sufficient cover.
Obviously, when playing for the Empire, getting as many eliminations as possible in the first phase is key. Not only to make it harder for the Rebels in the later stages of the game, but also to gain Battle Points and the chance of ending the attempts of the Rebellion early.
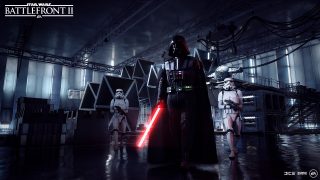
The sooner you can spawn in as a villain, the better. If you manage to go on a good enough streak to spawn in as Darth Vader, you’ve a golden opportunity of shutting down the opposition. With his ability to soak up damage, block incoming attacks, and Force throw his saber, the Sith Lord is well fitted to battle throughout the corridors of Death Star II. And, honestly, who would’ve expected anything less from Vader on his home turf?
The Heavy class is a good all-round choice if your main goal is to help your team by clearing the vicinity of enemies with raw firepower. Just keep on the move between the objective areas and the surrounding corridors, deploy your Combat Shield when needed, and watch your back.
Bonus tip for those feeling a little cheeky: next to the tractor beam control objective, within the southernmost corridor of the map, there’s a set of two panels on each side of a gap, from which you can open and close a walkway. How you put this specific piece of information to use is up to you, but there’s certainly no safety padding at the bottom of this pit. Just saying.
Disable the Weapon Systems
The tractor beam has been shut down, but the weapon systems are still operational. Unfortunately for the Rebels, they’re not going any further if the state of things stays that way. Next phase will therefore have the sides fighting over the turbolaser systems. But also over the main weapon control, where the Rebels are looking to give their fleet an edge in the space battle raging outside.
The turbolaser systems is found in a red-lit area with steam coming up from the floor. It’s a confined space, but it’s also observable from a level above. As an Imperial, it’s at this point where you will have your best shot at any incoming Rebels running for the objective. If they manage to get out of your line-of-sight, you can quickly drop down to get up close and personal.
The weapon control objective is set in a more open area, situated next to an armory with stormtrooper armor laying in droves on shelves and the weapon itself, firing green rays of demise in regular bursts (we strongly advise against stepping in its way while it’s doing so). And if you haven’t already, you’ll have a good chance of running into a strolling GNK power droid (also known as Gonks – practically walking batteries, only equipped a simple artificial intelligence) around this area.
Here, the Rebels must combine their strength in order to succeed. There are several entry points to this room, with the big center hallway usually the most crowded one. Flanking through the smaller corridors on the sides of this main entryway is a solid plan, with the possibility of catching your enemy off-guard, facing the other direction.
Once inside the objective room, make sure it’s clear of any Imperials before accessing the weapon control. The Wookiee Warrior is a mighty ally in your attempts to fend off incoming enemy troopers, and as an Imperial, the Death Trooper is at least as powerful. And just like the Officer, Leia Organa has a Squad Shield – an even stronger one – that she can deploy to protect her team while securing the systems.
Bring Up a Shuttle and Clear its Path
Tractor beam disabled so the Imperial forces can’t pull the Rebels back in? Check. Weapon systems offline so they can’t shoot them down either? Double-check.
Now, the Rebels just need to hijack an Imperial Lambda-class shuttle to get off this station before it blows up. Consequently, the final phase will have the factions fighting over the hangar control and the shuttle bay elevator.
Most of the above tips can be utilized in this final stand as well. With the hangar area being more open than the corridors you just came from, the Specialist class is now a little more viable.
If you’ve saved up your Battle Points until this phase, it’s a good idea to pick a blaster-type hero of your choice to control enemy spawns on each side of the open hangar bay area. So are Emperor Palpatine or any lightsaber-wielding hero if you instead plan to linger in the direct vicinity of the objectives.
–Daniel Steinholtz (Follow Daniel on Twitter @dsteinholtz)
This article is part of our series, “Exploring the Locations of Star Wars Battlefront II,” giving additional context and gameplay tips for iconic battlefronts available in the game. Read about our previous excursions to Kessel, Mos Eisley, Theed, Kashyyyk, Geonosis, and Endor. And as always, remember to keep an eye on this space for full coverage of Star Wars Battlefront II.
Also, sign up today to receive the latest Star Wars Battlefront II news, updates, behind-the-scenes content, exclusive offers, and more (including other EA news, products, events, and promotions) by email, and be sure to follow EA Star Wars on Twitter, Facebook, and Instagram, or join the discussion on the official forums.
