UFC 4 Damage Model Deep Dive
Take a deep dive into the UFC 4 damage model to get a better understanding of what’s happening behind the scenes!

Hello EA SPORTS UFC fans!
From both a competitive balance and real-life authenticity standpoint, we’ve done a lot of work over the years to make the impact of strikes feel just right. We try to account for all of the factors that contribute to how much damage a strike deals when it connects with an opponent. Most of these are pretty intuitive and make sense when you’re playing, but many community members have expressed a desire to know exactly what’s going on under the hood. Why does the same strike hit harder in some cases than others, and how much harder does it hit?
We recently released a new tool - the damage HUD in practice mode - to help players dig into the damage model and better understand how to capitalize on different opportunities during a fight and when they’re leaving themselves open to trouble. However, the tool doesn’t show the whole picture since it focuses on the most meaningful and dynamic pieces of the model to avoid overwhelming players with too much data or data that doesn’t change much from one context to another.
In this blog we’re going to go over the entire standup damage model in detail, and make use of that new HUD to help you understand how you can learn even more about the combat in UFC 4.
For purposes of this blog we will break things down into three large pieces, then dig into each of those further. The large pieces that we will be breaking down are base damage, damage range, and damage modifiers. These pieces make up the final calculation which is base damage added to damage range and then multiplied by the damage modifiers or ((base + range) x mods).
Base Damage:
This one is pretty straight forward, and is a single number tuned by hand; but there are many different factors that go into choosing which number that is. Weight class and strike type are the first two, and are pretty obvious. However, this is broken down even further by the strike side (lead or back), the strike target (head, body, legs), the clinch position if any, and the clinch role if any (dominant or neutral, and submissive). Every single combination of those factors leads to a different hand-tuned value for the base damage of a strike.
For example, throwing a hook to the head as a heavyweight vs featherweight will have a different value, as would throwing a roundhouse to the body vs the legs. It would also be true that throwing a hook from a Thai Clinch would be different than regular standup for the same fighter.
This value is the starting point for the rest of the calculation, and is very important.
Damage Range:
Damage range is a combination of different factors with the intention of differentiating the same strike between different fighters, assuming an identical base damage scenario of weight class, strike type, etc.
The first part in this is to figure out how much flat damage is allowed to be affected by the other factors. This is done with another tuning value with the same breakdown as the base damage, however this one is a percent, not a flat value. This percent is then applied to the base damage and that gives us our starting point. For example, if a strike had a base damage of 20, and our damage range was 40%, we’d get a starting value of 8.
Now we start getting into the fun stuff! Here’s the list of factors that weigh into damage range:
- Stance mod - This comes directly from the fighter’s switch stance rating, and is used when they’re not in their default stance.
- Power mod (P) - This comes from the relevant power rating, and is multiplied by the stance mod. This is also impacted by the current leg health of the fighter.
- Level mod (L) - This is based on the strike’s move level, and is also multiplied by the stance mod.
- Overkill mod (O) - This mod rarely comes into play anymore, but is used when perks effectively push the power rating above 100. This was used a lot more in UFC 3, but is still active.
- Sway mod (S) - This applies a 20% damage range buff when in a sway counter strike scenario.
- Chin mod (C) - If a fighter has particularly low ratings on their chin, body, or legs, then this increases the amount of damage they take to those areas.
Continuing from our previous example, we have a potential damage range (DR) of 8. Each mod is used slightly differently with respect to this initial value, and they’re all added up at the end. Some of the components split the available DR and some add on after. For example, power accounts for half of the available range. This means a fighter with perfect stats, in their default stance, and with no leg damage would get a final value of 4 from that component; but if any of those factors start to drop then so will the amount of damage generated by power. Similarly, move levels account for 40% and the overkill mod 10% of the available range. The sway and chin mods are added on top after, and apply their bonus against the full amount of range. In total it looks like this:(DR * 0.5 * P) + (DR * 0.4 * L) + (DR * 0.1 + O) + (DR * S) + (DR * C)
Together, that makes up the final damage range, which is fairly static for any one fighter throwing a particular strike, but differentiates them from other fighters throwing that same strike. In the damage HUD, the base and range are combined and displayed inside the ( ), indicating the flat damage of the strike without any contextual modifiers.
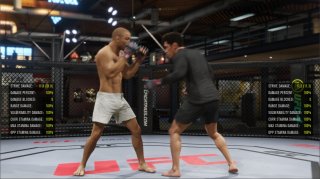
Here’s an example of José Aldo and Dominick Cruz both throwing a basic jab with no contextual modifiers being applied. Both are using identical base damage here, but their damage range is different, producing a different result.
Damage Modifiers:
The damage modifiers are the contextual factors that go into a strike. Things that change moment to moment, and evolve naturally as the fight goes on. Most of these should be fairly intuitive in concept but their precise impact can be hard to guess, which is why the HUD displays the most important ones. These values are all multiplied against the base damage and range, giving the actual final impact of the strike.
- Blocked Damage Mod - A complex calculation in its own right, this impacts how much damage gets through a successfully blocked strike. The HUD displays the actual amount of damage that was blocked so that the total damage of the impact is still apparent. This alone can really help players understand the block bleedthrough when a heavy strike still causes damage through the block, as well as the block breakdown meta (throwing combos with varying trajectories).
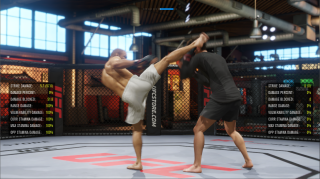
The below example showcases a roundhouse to the head from Aldo. None of his other modifiers are affecting this situation, so the block is the only factor changing the damage. We can see that while the base + range was 57.6 only 5.7 got through, with the rest being absorbed by the block. This is outside of a combo and had no setup, so we know that the block breakdown isn’t coming into effect. The 10% of damage still sustained by Cruz is due to the bleedthrough on the roundhouse as it’s just too heavy a hit to brush off entirely.
- Strike Range Mod - Based on the ideal range of landing the strike. Being too close or too far reduces damage. The fighter’s reach and target height impact this where necessary, such as trying to punch the head of a jumping or ducking opponent.
- Vulnerability - A very complex value, vulnerability can increase or decrease the final damage. Derived from situational exposure to an incoming strike, such as leaning into or away from a strike, being hit mid-spin and not seeing the strike coming, or getting caught in the middle of a poorly timed taunt.
- Current Stamina Mod - Based on current stamina percent and stamina rating.
- Max Stamina Mod - Based on current max stamina percent and stamina rating (Two fighters with same percent but different rating will have different value).
- Opponent Stamina Mod - Based on the opponent's current stamina, this helps replicate a fighter’s last second reflex to move away from strikes. Not all targets use this modifier.
- Movement Damage Mod - Based on current movement direction and strike side, this aims to help replicate a fighter’s bodily momentum as it pertains to the strike. Such as moving forward and throwing with the lead hand.
- Weight Class Delta - Fighters do more/less damage to opponents in different weight classes, such as in open weight tournaments.
- Damage Muffling Mod - If a fighter was hit during their wind-up but not stopped from striking entirely, their strike will deal less damage upon impact.
- Back to Cage Mod - Fighters deal less damage when their back is against the cage, as they can't properly wind up or plant their feet in an offensive stance.
- Slider Damage Mod - This is directly driven by the damage slider available in many offline modes.
Let’s look at some examples to showcase these mods, then call it a day! Both fighters have strike data in their HUD, as the last strike’s data will stay there until a new strike lands. We’ll break down Cruz’ first, which happened before the uppercut pictured.
He threw a rear straight which hit clean but only did 8.7 damage, just under 40% of his basic damage for that strike. This is because even though his max stamina was still pretty high at the time, his temporary stamina was quite low. Cruz was also a bit too close when he threw the strike, so couldn’t get a full extension on his arm and was jammed up. Aldo, on the other hand, was totally fresh and not doing anything to increase his vulnerability when the strike connected, so there were no bonuses. These conditions are reflected in the mods, and make for the bulk of the damage loss.
He threw a rear straight which hit clean but only did 6.1 damage, just 26% of his basic damage for that strike. This is because even though his max stamina was still pretty high at the time, his temporary stamina was quite low. Cruz was also too close when he threw the strike, so couldn’t get a full extension on his arm and was jammed up. Aldo, on the other hand, was totally fresh and not doing anything to increase his vulnerability when the strike connected, so there were no bonuses. These conditions are reflected in the mods, and make for the bulk of the damage loss.
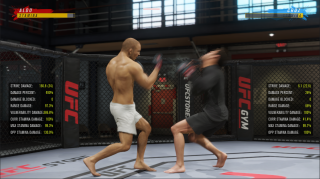
However, the example we see currently playing out from Aldo is a very different story. Here, Aldo is delivering a brutal uppercut which is dealing nearly 167 damage instead of his regular 34. That’s an instant KD, if not an outright KO. The first and most obvious factor here is the vulnerability. He’s catching Cruz right at the apex of his duck, which is a very dangerous combination. He’s also benefiting significantly from how drastically low Cruz’ stamina is, giving him a 30% damage boost. Even though he’s slightly out of the ideal range, getting a 3% damage reduction, this strike is dealing a total of 490% bonus damage. This is how supposed ‘flash KOs’ transpire; not as a random event, but the sum of many important and contextual factors.
In recent patches, we’ve also been able to extend the HUD’s functionality to strikes during grapple, both in and out of the more fierce ground and pound exchanges. Certain factors, such as range management, aren’t considered while on the ground, but using this HUD to better understand the strengths and weaknesses of different positions, strikes, and forms of defense while grappling can be just as important and informative as in the standup.
The possible situational complexity and simulation of so many real life factors in the damage model of UFC 4 leads to near endless possibilities, but we've strived to make every outcome seem as intuitive and natural as if you saw it unfolding in a real octagon.
