Exploring the Locations of Star Wars™ Battlefront™ II: Endor
Tips, tricks, and more to arrive prepared for battle on the forest moon of Endor in Star Wars™ Battlefront™ II.

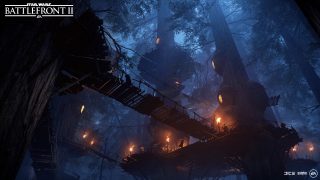
The flora and fauna on Endor is really something a little extra. Reptavian geejaws circle the air beneath the lush tree crowns, and Ewoks trek the forest floor and the settlements above – made up of huts, platforms, and walkways between the giant, Endorian trees. A place of beauty and serenity, no doubt, but the Sanctuary Moon has also seen its share of conflict.
It’s a good thing then that the Ewoks are fiercer than a first impression might reveal. The furry dwellers will dispose of any incoming threat by sounding their battle horns, releasing a small species of native fire spirits called Wisties, and fighting relentlessly with their spears.

Players of Star Wars™ Battlefront™ II can, in fact, assume the role of an Ewok and use these tools to fend off the invading stormtroopers in Ewok Hunt, while the scenario in Galactic Assault depicts something different.
Taken aback by the destruction of the orbiting Death Star II, lingering Imperial troops scramble to evacuate the hidden military stations on Endor. Once outnumbered and outgunned, revitalized Rebel forces push to steal an AT-AT walker to blast through the defenses around the Imperial Research Station 9. When inside, they must take control of the base before the enemy manages to make it off-world.

The destruction of Death Star II from Inferno Squad’s perspective on Endor. This particular scene is from the single-player campaign of Star Wars Battlefront II.
To help you in your efforts on either side, we’re going to survey the vegetated terrain and provide some tips and tricks on how to master the battle on this forest moon.
Location name: Endor
Known for: Being the home world of the Ewoks and secret construction site of Death Star II.
Available game modes: Galactic Assault, Blast, Strike, Heroes vs. Villains, Hero Showdown, and Ewok Hunt.
“Hutar! Hutar!” – exclaimed by startled Ewok, while fleeing the sudden outbreak of violence between the Rebels and the Empire on Endor.
Securing the AT-AT Walker
The first objective for the Rebels is to hijack the AT-AT. But in order to pull off such a bold move, you’ll need a solid plan.
From the initial Rebel spawn point, you have the choice to take a left, right, or go straight ahead once you’ve rushed past the landed Lambda-class shuttle. So, where do you go? It’s up to you, of course, but consider this: out of the three objectives, the computer station – situated down the center lane, inside the building – is usually the most contentious one. Therefore, taking a left for the fuel station, or hurrying down the path to right for the walker bay, might set you up for smoother start.
You’ll see that both sides offer the Rebels a high-ground overlooking the objectives. Think about how you can utilize these vantage points to assist your team. Maybe lay down covering fire as a Support trooper? Or deploy a turret at the edge of the cliff with the Officer class? Remember that turrets have the advantage of pinging enemies on the mini map as well, readying you for incoming threats – something that’s especially handy in the multi-level, hilly terrain of this area, where enemies can appear at any moment, from any direction.
Before going in for the capture in either location, make sure that you’ve cleared the surroundings of any hostiles. And, as you’ll be left defenseless while accessing the consoles, check that someone (or, preferably your whole squad) has your back. Once these two objectives are taken, all efforts from your team can be focused on the computer station.
As an Imperial, you’ll spawn beneath the AT-AT loading gates. The walker bay is the closest to your spawn area of the three objectives, so you might not expect the Rebels head there first. But keep a lookout still from the get-go. Who knows – they might have taken a couple of our nifty little tips and tricks above to heart!

Now, as mentioned, for the Rebels to be able to push forward, they need to capture all three objectives. So, in practice – fighting for the side of the Empire – you only need to lock down one of them.
Just imagine the satisfaction of stopping the Rebel scum from stealing the AT-AT and winning the game in the first phase!
Your best bet applying this strategy is to focus your efforts on the computer station. Compared to the relative openness surrounding the other objectives, this console is situated in a more confined, defendable area.
Leading up to the console, two corridors facing the initial Rebel spawn point need to be secured. Locking down these hallways will take you a long way, but the Rebels might also drop in from the previously mentioned cliffsides and enter the building from the back.
There’s a forest-covered hill directly on top of the same building, offering a good line of sight to all directions. From here, you can cut off any incoming Rebels trying to sneak in around the back. Get up on this elevated area by climbing the fallen tree by the western cliffside (the one close to the fuel station objective) and said hill will be directly on your left.
If the Rebels manage to take control over all three objectives, however, it’s time for the Imperial forces to fall back and regroup.
Taking the AT-AT for a Walk
So, the Rebels have actually stolen an AT-AT from the Empire? Impressive. The mission for the Rebel Alliance now is to defend this man-made monster while it’s stomping through the forest up to the doorstep of Research Station 9.
Playing as a Rebel, look out for enemies carrying Ion Disruptors and make it a priority to take them out. This is a weapon known to be powerful enough to disable an entire starship, and it can damage the AT-AT considerably and make it vulnerable to lesser weaponry. Equally, if you’re serving the Empire, releasing some good jolts at the AT-AT with the disruptor is essential for your success in this phase.
Most action will be concentrated to the two, large vegetated areas, divided by a cleared path where the AT-AT is marching forward. Stepping into this path is a sure way to become an open target for opponents hiding in the bushes from both sides, so cross this part of the level at your own risk. Also, it’s a highly unpleasant experience being stepped on by a twenty-two and a half meters high war machine. So, watch out for that, too.
While speaking of the massive vehicle – playing on the Rebel side, don’t forget that you can use some Battle Points to board it and deliver the Imperials an unhealthy dosage of their own medicine via its devastating arsenal! A personal favorite – especially when playing the level on nighttime settings – is to spawn in as Yoda, switch off the lightsaber, utilize his modest height to hide in the thick foliage, and surprise attack unsuspecting stormtroopers.
Even though all classes have their perks and drawbacks here, a longer-range blaster should do some good work. Maybe even more so if you decide to ascend to the Ewok treetop settlement, accessible from the ground via ramps. There, you can enjoy a really good overview of the battlefront and start picking off the opposition. Keeping on the move between platforms and huts minimizes the risk of being caught in the act.

At this point, taking a step back and thinking about the current situation, things are looking a little bleak for the Empire on Endor. The second Death Star has been destroyed. Rebels have stolen an AT-AT and are on a furious offensive. The chance of evacuating with at least a little honor intact is becoming slimmer by the minute. But anyone who has served the Dark Lords of the Sith knows that a setback mustn’t result in a lack of faith.
Chin up, spend your Battle Points on the AT-ST, or any blaster-wielding hero, and set up an impenetrable defense around the compound. Once the Rebel-controlled AT-AT has closed in, you can either stand far back behind cover and guard the middle lane of the compound as a Specialist sniper, or get up close and personal on the flanks.
Fighting Over Research Station 9
If the Rebels manage the breach and enter the station, you’ll experience one of the most intense battles in Star Wars Battlefront II.
All 40 players will cram into the interiors of the station, fighting over a single capture point. Similar to the last stand in the throne room on Theed, the Assault class’ Scan Dart Ability, Finn’s Undercover Team Ability, or Rey’s Insight Ability are handy tools in this tight space.
In fact, you can do well with any lightsaber-wielding hero, as the distance between you and the enemy is dramatically shortened compared to the other phases. If you need some breathing room, while the Rebels can’t capture the point from here, the upper level is usually less crowded.
And if there’s one place to use the Heavy class on Endor, you’ve found it. The class’ generous health and high-damage weapons, together with the Combat Shield and Sentry Abilities, are all perfect fits for fighting through the corridors.
Good luck, soldier!
–Daniel Steinholtz (Follow Daniel on Twitter @dsteinholtz)
This article is part of our series, “Exploring the Locations of Star Wars Battlefront II,” giving additional context and gameplay tips for each location available in the game. Read about our previous excursions to Kessel, Mos Eisley, Theed, Kashyyyk, and Geonosis, and check back regularly to learn more about other corners of the galaxy. And as always, remember to keep an eye on this space for full coverage of Star Wars Battlefront II.
Also, sign up today to receive the latest Star Wars Battlefront II news, updates, behind-the-scenes content, exclusive offers, and more (including other EA news, products, events, and promotions) by email, and be sure to follow EA Star Wars on Twitter, Facebook, and Instagram, or join the discussion on the official forums.


