
Exploring the Locations of Star Wars™ Battlefront™ II: Kachirho Beach
Master the ins-and-outs of the Wookiee home world with some handy tips and tricks.
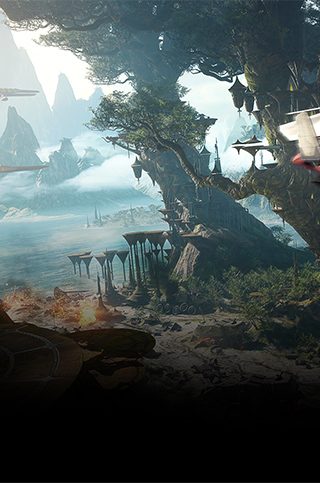
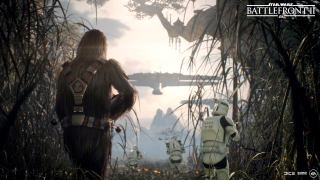
Home of the Wookiees, Kashyyyk was crowned by giant wroshyr trees, rising several hundred meters tall and massive enough to carry entire communities. One such settlement was the coastal city of Kachirho.
As seen in Star Wars™: Episode III – Revenge of the Sith™, a momentous series of events unfolded at this very spot. Here, the Separatist droid army exploited Kachirho’s placement on the beach to launch an assault against the Galactic Republic and the supporting Wookiees. This large-scale skirmish took place during the final moments of the Clone Wars, and where Master Yoda was seen evading Emperor Palpatine’s execution of Order 66.
But Kachirho on Kashyyyk is also home to intense battles in Star Wars™ Battlefront™ II. Below, we’re giving you a guided tour through some of its most contested areas and offering some survival tips as we go.
Remember that these are only a few friendly suggestions! The best way to become a fierce combatant on Kashyyyk is, of course, to deploy on the home world of the mighty Chewbacca yourself.
Location name: Kashyyyk – Kachirho Beach
Known for: Its beautiful beach side, dense forests, and furry inhabitants.
Available game modes: Galactic Assault, Heroes vs. Villains, Blast, Strike, Hero Showdown, and Arcade.
“RRRrrruurgh! Arrggg!” – Wookiee Warrior, as said before a game of Galactic Assault on Kachirho Beach.
Kachirho Beach
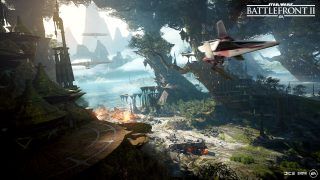
Galactic Assault on Kashyyyk depicts a scenario where the Separatists aim to take out a Venator-class Star Destroyer, sitting a few hundred meters up-country from the coast.
The skirmish starts with the droid army’s annexation of Kachirho Beach. It’s an impressive scene, with looming C-9979 landing crafts populating the sky, NR-N99 Persuader-class tank droids ascending the terrain from the shallow waters, and two mammoth Multi-Troop Transports (MTTs) pushing the frontline onward.
Speed and force are of the essence here for the attacking droids, and if you’re playing as one, a way to possess both is to spawn in as the Assault class and activate the Vanguard Ability. It equips you with a shotgun and boosts your movement.
Use the ability to get away from the open sightlines of the beach and the neighboring field as soon as possible. The opposite end will certainly be sprinkled with sniping clone troopers, and you’d rather not be a part of their target practice.
Now, rush towards the southern flank where you’ll find some buildings and cover. Stay around this area and ready up your shotgun for close-quarters combat as the two MTTs make their way inland. Speaking of the big fellows – spawn into one as soon as you can and fire its heavy artillery to obliterate the opposition! If used effectively, it’ll earn you a decent amount of Battle Points.
Spend these hard-earned points on an AAT battle tank to protect the MTTs in return. If they’re destroyed, the Separatist assault is over. So keep an eye out for enemies wielding Ion Disruptors, out to damage the MTTs, and hunt them down.
Or, use the Battle Points to spawn in as a blaster type hero – Bossk, Iden Versio, Phasma, or Boba Fett in the case of the Separatists – as their long-range firepower is highly useful in this open-ended area.
Similarly, if you’re defending as the Galactic Republic, spawn in as an Assault trooper and use Vanguard to counter like-minded enemies on the southern flank. Specialists will also have a good time in phase one, picking off droids ignoring our advice and straying out in the open. Finn, Leia Organa, Han Solo, or Lando Calrissian are all feasible heroes to use at longer range as well.
But, most importantly, don’t forget to fire the Ion Disruptors – or protect your teammates doing so – to help the Galactic Republic destroying the MTTs! Move in as close as you need to, to get a lock on the target. The more damage you do early on, the better. As time passes, the MTTs will continuously move closer together and become even more deadly as they approach the vegetated area of the field.
More good advice for anyone playing on the Galactic Republic side is to spawn in the LAAT, circling the battlefront around the wroshyr canopies. Its laser canon packs quite the punch.
The Juggernauts
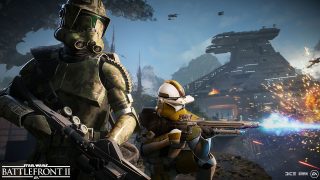
Once through the vegetation speckled with clone troopers, Wookiees, and tach primates, the next mission for the Separatists is to blow up two Juggernauts, stationed in front of the Venator-class Star Destroyer.
The warfare now funnels into two confined areas, and your strategy should change accordingly. As a Separatist, using a hero, enforcer, or trooper equipped with Abilities or weapons fitted for close-range face-offs is key. Any lightsaber hero can cause massive damage once inside and be used to hold the fort while the bombs are armed.
Stopping the droids from entering the turbo tanks is therefore key for the Galactic Republic. Specialists can use the cover in the Star Destroyer to peek out and snipe enemies from a distance, helping to clear up the entrances of the Juggernauts.
If the Separatists prove successful, however, the combat continues to the interiors of the Venator-class Star Destroyer, where the Galactic Republic must now take refuge and regroup for a final stand.
The Venator-class Star Destroyer
Here, holding the hangar door for as long as possible is vital to the Galactic Republic. The longer you hold it, the better your chances are, as enemies won’t be able to reach the objectives. Use the Assault or Heavy class and coordinate with your team to make an impenetrable wall of blaster fire.
Just be ready to fall back and defend the fuel cells if the droids manage to break through. Heroes that might be of good use to clean up around the cells are Luke Skywalker, Yoda, Obi-Wan Kenobi*, and Rey.
Consequently, Separatists must push as far as possible, as soon as possible, to reach and destroy the exposed fuel cells. The clones are respawning at the back of the ship – if they’re not able to squad spawn, of course – so once you’ve smashed through their defenses, it’s a tough task for the clones to regain the high ground (even with the help of Obi-Wan).
The third phase will inevitably end with the Republic either celebrating a glorious victory with LAATs hammering the final nail in the droid army coffin, or evacuating an exploding ship as the droid army proves too powerful.
Wookiee Treetop Settlement
Galactic Assault actually leaves one area out in this location, one which you’ll have to jump into other game modes to explore and battle through.
Playing Kashyyyk in the smaller game modes, including Blast and Hero Showdown, transports you up to the Wookiee settlement in the treetops. If you want to know more about how to excel in Hero Showdown, head over in this direction to gain some wisdom. Below is some general advice for Blast.
The only objective in Blast is to eliminate the enemies before they do the same to you. This lets you focus on the level itself and the moment-to-moment combat.
Staying in the outer perimeter of the map will reduce the number of directions that you can get eliminated from. Players tend to run towards the center of the location, which provides more targets, but it also makes you one. Adopting the strategy of dropping in and out from the periphery might give you the best of both worlds.
Also, listen. Make sure you have the optimal settings for your headphones or sound system, and you’ll be able to hear the directions from which enemy footsteps are coming from, and ready yourself for engagement. And keep moving. Never stand still. It’ll make you a harder target and might just provide the tiny head-start you need when the combat heats up.
This article is part of our series, “Exploring the Locations of Star Wars Battlefront II,” giving additional context and gameplay tips for each location available in the game. Read about our previous excursions to Kessel, Mos Eisley, and Theed, and check back regularly to learn more about other corners of the galaxy. And as always, remember to keep an eye on this space for full coverage of Star Wars Battlefront II.
Also, sign up today to receive the latest Star Wars Battlefront II news, updates, behind-the-scenes content, exclusive offers, and more (including other EA news, products, events, and promotions) by email, and be sure to follow EA Star Wars on Twitter, Facebook, and Instagram, or join the discussion on the official forums.
*New heroes are available for Credits earned in-game
