
Exploring the Locations of Star Wars™ Battlefront™ II: Geonosis
Tips and tricks to survive and conquer the tough conditions on the Geonosian home world.
Geonosis might be most well-known for the significant events that transpired at the dawn of the Clone Wars. Overseen by Count Dooku (read our interview with Corey Burton voicing Dooku in Star Wars™ Battlefront™ II) and his master Darth Sidious, plans for the Death Star were developed on the planet in conspiracy with the Geonosians, as well as the construction of the Separatist droid army.
While the entirety of its devastating scope wouldn’t become clear until years later, the scheme of the menacing Sith Lords eventually came to the attention of the Jedi, which incited a large battle on the planet’s rough surface between the Separatists and the Jedi-led clones. Not long after, the construction of the very same, world-shattering super-weapon begun in orbit around Geonosis, and the planet was ultimately sterilized by the Empire to keep the project a secret.

The planet of Geonosis, where the Separatist droid army was manufactured, and the Death Star began construction in its orbit.
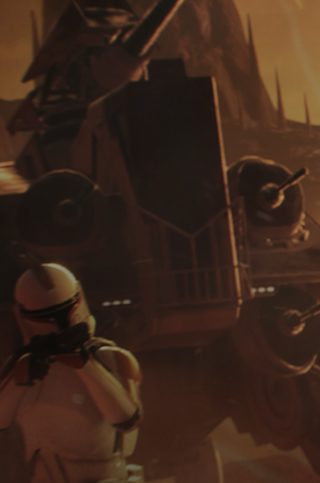
Deploying on Geonosis* in Star Wars Battlefront II, you’ll notice spiraling mountain hives built by, and for, swarms of the crafty and insect-like natives. A handful of large core ships, designed to transport entire droid armies across the galaxy, are recognized by their spherical appearance. It’s an unfriendly and dusty scenery, tinted by endless shades of red and brown.
Yes, you’ve got it: Geonosis is a harsh place. It’s only fitting then to give you some tips and tricks below – not only to help you survive, but also to point you in the direction of glorious victory.
No matter if you’re crushing the clones’ endeavors as the droids or disassembling the clankers with some well-targeted blaster heat, we’ve got you covered.
Location name: Geonosis – Trippa Hive
Known for: Being the scene of the first major battle of the Clone Wars. Not long after, a second clash between the Galactic Republic and the Separatists took place on the barren world.
Available game modes: Galactic Assault, Blast, Heroes vs Villains, and Custom Arcade.
“Together brothers!” – Clone trooper officer while charging to reclaim the Turbolasers on Geonosis.
The Canyons
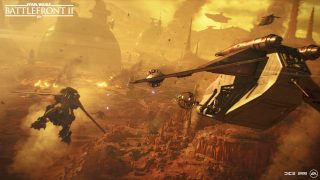
Starting off in Galactic Assault, the struggle between the Separatists and the Galactic Republic is channeled through a large body of canyons, with caves dug into the mountainsides and the Geonosian-built hive-towers composing the location’s characteristic, thorny skyline.
Observing the area, you won’t be able to miss the alarmed natives zipping above the heads of you and your mates, orchestrating a hostile, guttural sound palette. The Geonosians are known for their strong work ethic and for being gifted engineers, operating advanced droid foundries on the planet. Before the battle begins, we learn that the clone troopers have been pushed back while attempting to rig explosive charges in one of them.
To stand a living chance and continue the assault, the clones must now call for reinforcements. The ones left scrambling have identified two objectives to do so. One is a deactivated AT-TE situated on the western cliffside. The other is a comms station tucked in the canyon to the east. Both objectives are captured by accessing consoles at the sites. In contrast, the droids ought to do everything in their power to subdue the clones’ efforts.
A birds-eye view of Geonosis’ rugged landscape.
Your success in this first phase – independent of the faction you’re playing as – will largely be determined by your ability to play as a team. It’ll be next to impossible to attack or defend the objectives alone, so make sure to stay with your squad and utilize the squad system.
Deploying a Squad Shield as an Officer class clone trooper will efficiently protect your teammates from long-range blaster fire while capturing the objective. It’ll also force the enemy to push forward. As a Separatist, you should to set yourself up behind cover in the vicinity of the objectives as fast as possible. Activating the Vanguard ability as an Assault class droid will increase your speed and get you there swiftly.
Additionally, by exploiting the cover and verticality of the surrounding mountains, you’ll find good vantage points for Specialists and Assault troopers alike. Once you’ve earned enough battle points, think about spending them on the jetpack-equipped Jet Trooper or B2-RP Rocket Droid. It’s a fun and agile way to traverse between the rock formations, and, if used cunningly together with the rocket launcher, it’ll make you a real nuisance for the enemy.
If you want to go down the slightly less expected, sneakier route, look out for the tunnels in each of the two major rock formations. Most players tend to go around either side of the mountains, so cutting straight through might just set you up for some great flanking opportunities!
The tips provided in the above two paragraphs can be applied when playing Blast on Geonosis as well. If you’d like some quick, general advice on how to play Blast, head over to our article on Kachirho Beach and scroll down to the last section.
Fighting Over the Hardcells
If the clones manage to assume control over the AT-TE and call for reinforcements, the battle transforms from guerilla style combat in the gullies into complete, open warfare. When moving on from the enclosed canyon to the bleak, Geonosian fields, you’ll see the giant core ships looming in the distance and experience the true, grand scale of this war on Geonosis.

Obi-Wan Kenobi leading the clones on Geonosis.
Answering the call from their brothers, LAAT/c carriers are now swooping in with additional AT-TEs attached to their powerful, magnetic clamps, dynamically dropping the battle tanks on the battlefield. The six-legged beasts are critical for the clones’ next mission, to push the frontline forward and assault two Separatist Hardcell Transports.
Now, there are a couple of crucial points to keep in mind in this second phase.
First, the tickets that the Separatists need to drain from the Galactic Republic are switched from troopers to AT-TEs. Thus, attacking (or defending, as the Galactic Republic) the AT-TEs is crucial for the success of the droid army. Adapt your tactics accordingly, focus less on eliminating enemy infantry not threatening you directly, and maximize the damage dealt towards these machines by aiming at the weak point beneath its hull.
Conversely, using the AT-TEs, and using them right is critical for the Galactic Republic. The AT-TE has three useful Abilities. The Tactical Support helps close-by allies by refreshing their Abilities and scanning the area for droids. The Mass Driver Cannon puts the vehicle in siege mode, dealing a great amount of damage to anything or anyone on the receiving end. And the Ion Charge – while also extremely effective against a group of infantry droids with its wide blast radius – is mainly for weakening the Hardcells, allowing your fellow clones to take them down.
General Kenobi, AT-TEs, and the 212th Attack Battalion charging to reclaim the Turbolasers.
Make sure to learn the trajectory of the Ion Charge, and you’ll figure out exactly how close you need to be to the Hardcells to be able to hit the target.
Overall, the AT-TE is excellent in use together with infantry, as it not only boosts their Abilities, but can lay down covering fire from an elevated angle as well. Should the Separatists fail to defend the Hardcells, the impact of the falling structures will set off wild dust storms, and opening up the battlefront for the final phase.
The Final Push
The raging storms can be used as cover to advance on the enemy. Lasers and lightsabers will still cut through the low visibility, so make sure to turn off your saber if you’re playing as a hero. Do so by pressing the default “2” key on PC, the triangle button on Playstation 4, or Y on Xbox One.
Also, some players should find enjoyment in surprising their enemy up close, by igniting it again with the same command – maybe accompanied by a sly “Hello there!”
Depending on how much damage the Separatists have made to the Republic’s AT-TEs in the second phase, the amount of remaining reinforcements will vary. But no matter how many or few tickets there are left, there’s only one way to go for the clones: forward.
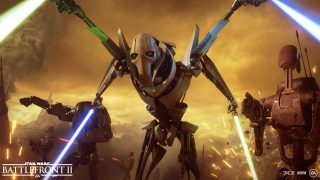
The Separatist Supreme Commander, General Grievous, leading the droid army to crush their opponents.
Here, the Galactic Republic will win the match by marching the AT-TEs into the large capture area to the north. This is where the Self-Propelled Heavy Artillery Turbolasers – the ones that the Separatists have laid siege on – are located. If successful, the clones can reclaim the imposing SPHA-Ts, which are among the strongest war machines in the Galactic Republic’s arsenal on the ground, and line them up to take down the Separatist core ships.
Though they might have the upper hand at this moment, players on the side of the clones shouldn’t get too cocky just yet! Because the Separatists are mustering all their remaining assets to obliterate the assault.
OG-9 homing spider droids are stationed as a last, but heavy, line of defense, dealing out massive damage against the AT-TEs with their laser cannons. The long-range villains Bossk and Boba Fett are good choices for any dark side player to reinforce the defense even more, with their explosive Abilities causing harm against the AT-TEs. Playing for the light side, calling in Han Solo or Leia Organa is a great counter.
Also, don’t forget to call in the STAP or BARC speeder! They’re potent and agile vehicles against troopers on the open battlefront.
–Daniel Steinholtz (Follow Daniel on Twitter @dsteinholtz)
This article is part of our series, “Exploring the Locations of Star Wars Battlefront II,” giving additional context and gameplay tips for each location available in the game. Read about our previous excursions to Kessel, Mos Eisley, Theed, and Kashyyyk, and check back regularly to learn more about other corners of the galaxy. And as always, remember to keep an eye on this space for full coverage of Star Wars Battlefront II.
*All updates require Star Wars™ Battlefront™ II on applicable platform (sold separately), all game updates, internet connection, EA account, and, for console players, Xbox Live Gold or PlayStation Plus membership (each sold separately)
